Start and Update iOS Live Activities With Push Notifications
The third part of a series on Live Activities.
- What are iOS Live Activities and Four Kinds of Presentations
- Add Live Activities to Your iOS App in 5 Steps
- Start and Update iOS Live Activities With Push Notifications
- Start and Update iOS Live Activities With Broadcast Push Notifications
Live activities are introduced in iOS 16.1.
You can start a Live Activity in your app's code in the foreground mode.
You can aslo update or end a Live Activity using push notifications or by directly modifying it in your code in the both foreground and background modes.
Starting with iOS 17.2 and iPadOS 17.2, you can als start new Live Activities using push notifications.
Step1: Add Push Notifications Capability to Your App

Step2: Start a Live Activity in your code
You can start a Live Activity in your app's code by calling request(attributes:content:pushType:) method and pass your own ActivityAttributes instance, initial live activity content and .token parameters.
By passing .token as the pushType parameter, you can then receive a push token that’s unique to this Live Activity when observing its pushTokenUpdates asynchronous sequence.
The push token is used for sending update or end push notificaitons to this Live Activity.
The push token for a Live Activity may change throughout its duration. so it's important to keep track of the push token for each Live Activity. When you receive an updated token, invalidate the previous, now outdated token on your server.
func startActivity() {
    guard ActivityAuthorizationInfo().areActivitiesEnabled else {
        print("You can't start live activity.")
        return
    }

    do {
        let atttribute = LiveActivityAttributes(name:"APNsPush")
        let initialState = LiveActivityAttributes.ContentState(emoji: "😇")
        let activity = try Activity<LiveActivityAttributes>.request(
            attributes: atttribute,
            content: .init(state:initialState , staleDate: nil),
            pushType: .token
        )
        self.currentActivity = activity

        let pushToken = activity.pushToken // Returns nil.
        Task {

            for await pushToken in activity.pushTokenUpdates {
                let pushTokenString = pushToken.reduce("") {
                    $0 + String(format: "%02x", $1)
                }
                print("New push token: \(pushTokenString)")
                //send this token to your notification server
            }
        }
    } catch {
        print(error)
    }
}
Step3: Start a Live Activity With Push Notifcations
To start Live Activities from push notifications, you first obtain the push-to-start token for starting a Live Activity and then send a start event push notifcation to your app using the push-to-start token.
1. Obtain the PushToStart Token
Use the pushToStartTokenUpdates asynchronous sequence of Activity class to retrieve a push-to-start token.
func getPushToStartToken() {
    if #available(iOS 17.2, *) {
        Task {
            for await data in Activity<LiveActivityAttributes>.pushToStartTokenUpdates {
                let token = data.map {String(format: "%02x", $0)}.joined()
                        print("Activity PushToStart Token: \(token)")
                        //send this token to your notification server
                }
        }
    }
}
Then, send the push-to-start token to your push server.
2. Send Push Notifcation to Start a Live Activity
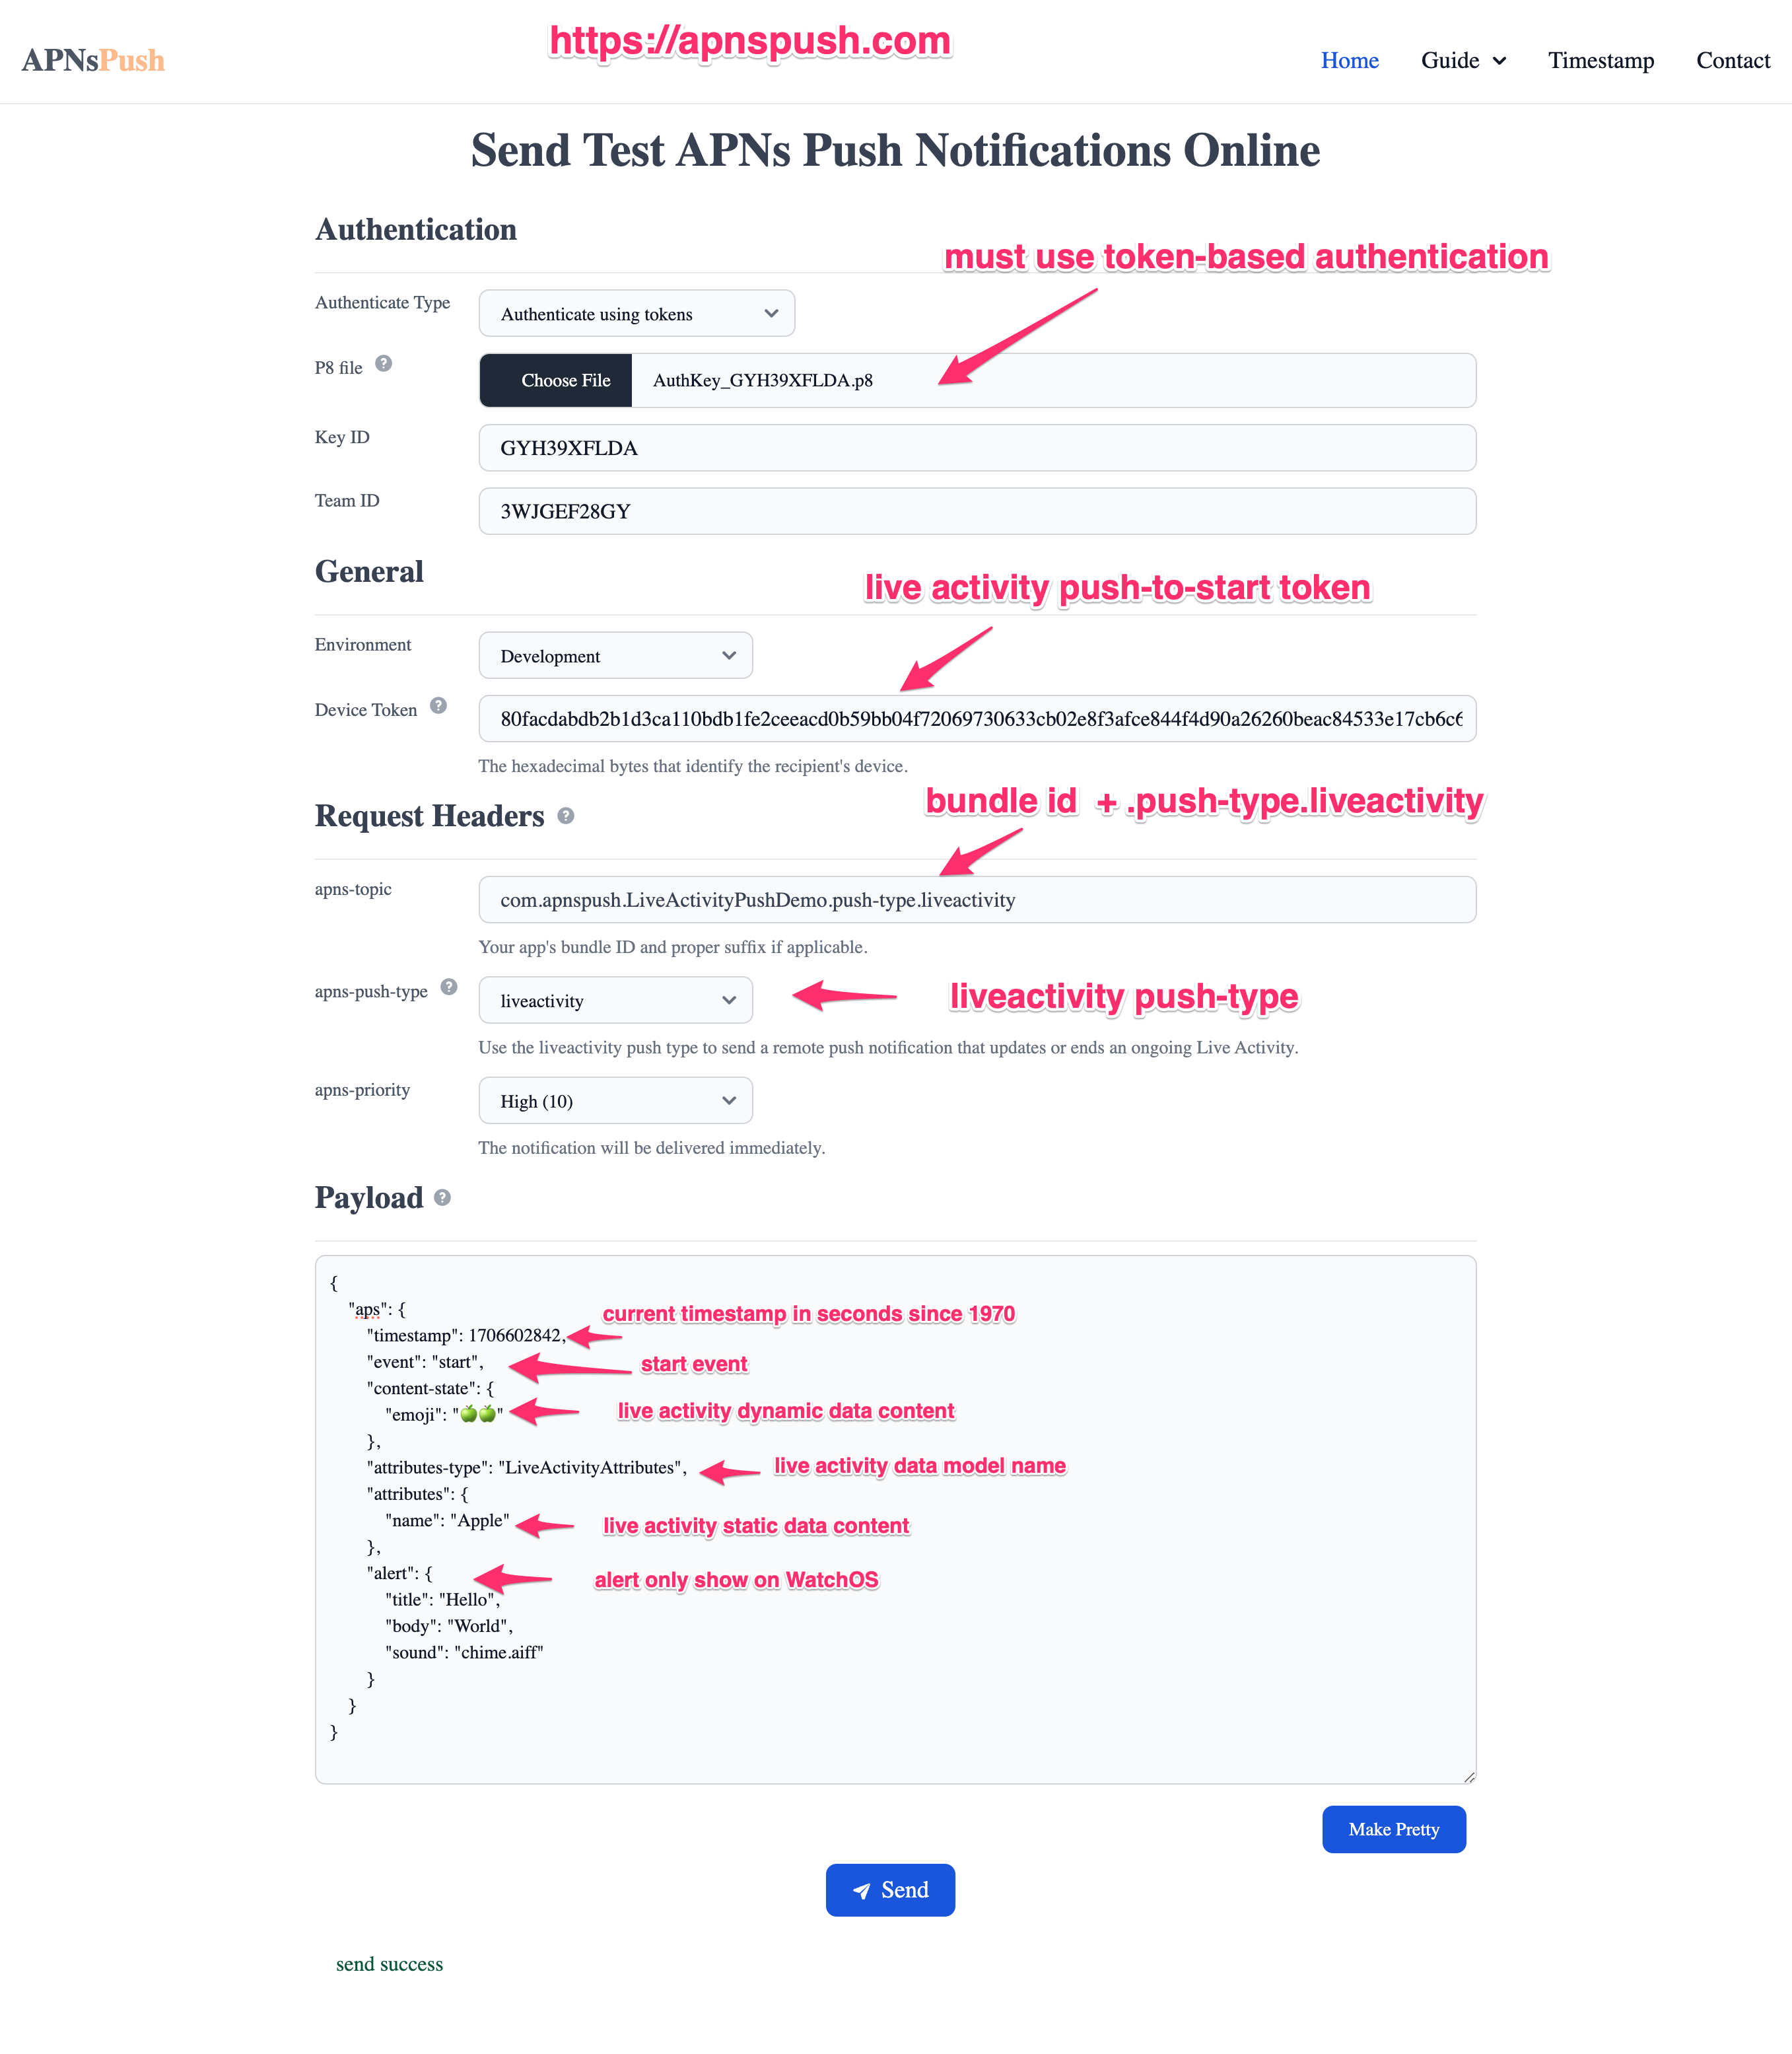
On your push server, use the push-to-start token to send a push notification to start a new Live Activity.
Authentication
You can only use Token-based authentication to send live activity push notifications.
Host
Use HTTP/2 and TLS 1.2 or later to establish a connection between your provider server and one of the following servers.
- Development/Sandbox Environment:
api.sandbox.push.apple.com:443 - Production Environment:
api.push.apple.com:443
Request Header
- :method:
POST - :path:
/3/device/<push_to_start_token> - authorization:
bearer <provider_token> - apns-push-type:
liveactivity - apns-topic:
<your bundleID>.push-type.liveactivity - apns-priority:
5or10
Payload
- timestamp: Current UNIX timestamp in seconds.
- event:
start - attributes-type: Your custom ActivityAttributes type.
LiveActivityAttributesin my case. - attributes: Static data of your live activity content.
- content-state: Dynamic data of your live activity content.
- alert: Alert the user about a new Live Activity.
For more payload fields, please refer to the afterward section.
{
    "aps": {
        "timestamp": 1705547770,
        "event": "start",
        "content-state": {
            "emoji": "🍏🍏"
        },
        "attributes-type": "LiveActivityAttributes",
        "attributes": {
            "name": "Apple"
        },
        "alert": {
            "title": "Hello",
            "body": "World",
            "sound": "chime.aiff"
        }
    }
}
You can use apnspush to send push-to-start push notifications as the following image.
3. Observe live activity push token updates in your code
When the system receives the ActivityKit push notification on a device, it starts a new Live Activity, wakes up your app, and grants it background run time.
You can receive the newly created Live Activity instance using the activityUpdates asynchronous sequence of the Activity class, and the observe the pushTokenUpdates asynchronous sequence of the Live Activity instance to get the push token used for update and end events.
extension AppDelegate {
func observeActivityPushToken() {
Task {
for await activity in Activity<LiveActivityAttributes>.activityUpdates {
Task {
for await tokenData in activity.pushTokenUpdates {
let token = tokenData.map {String(format: "%02x", $0)}.joined()
print("Push token: \(token)")
}
}
}
}
}
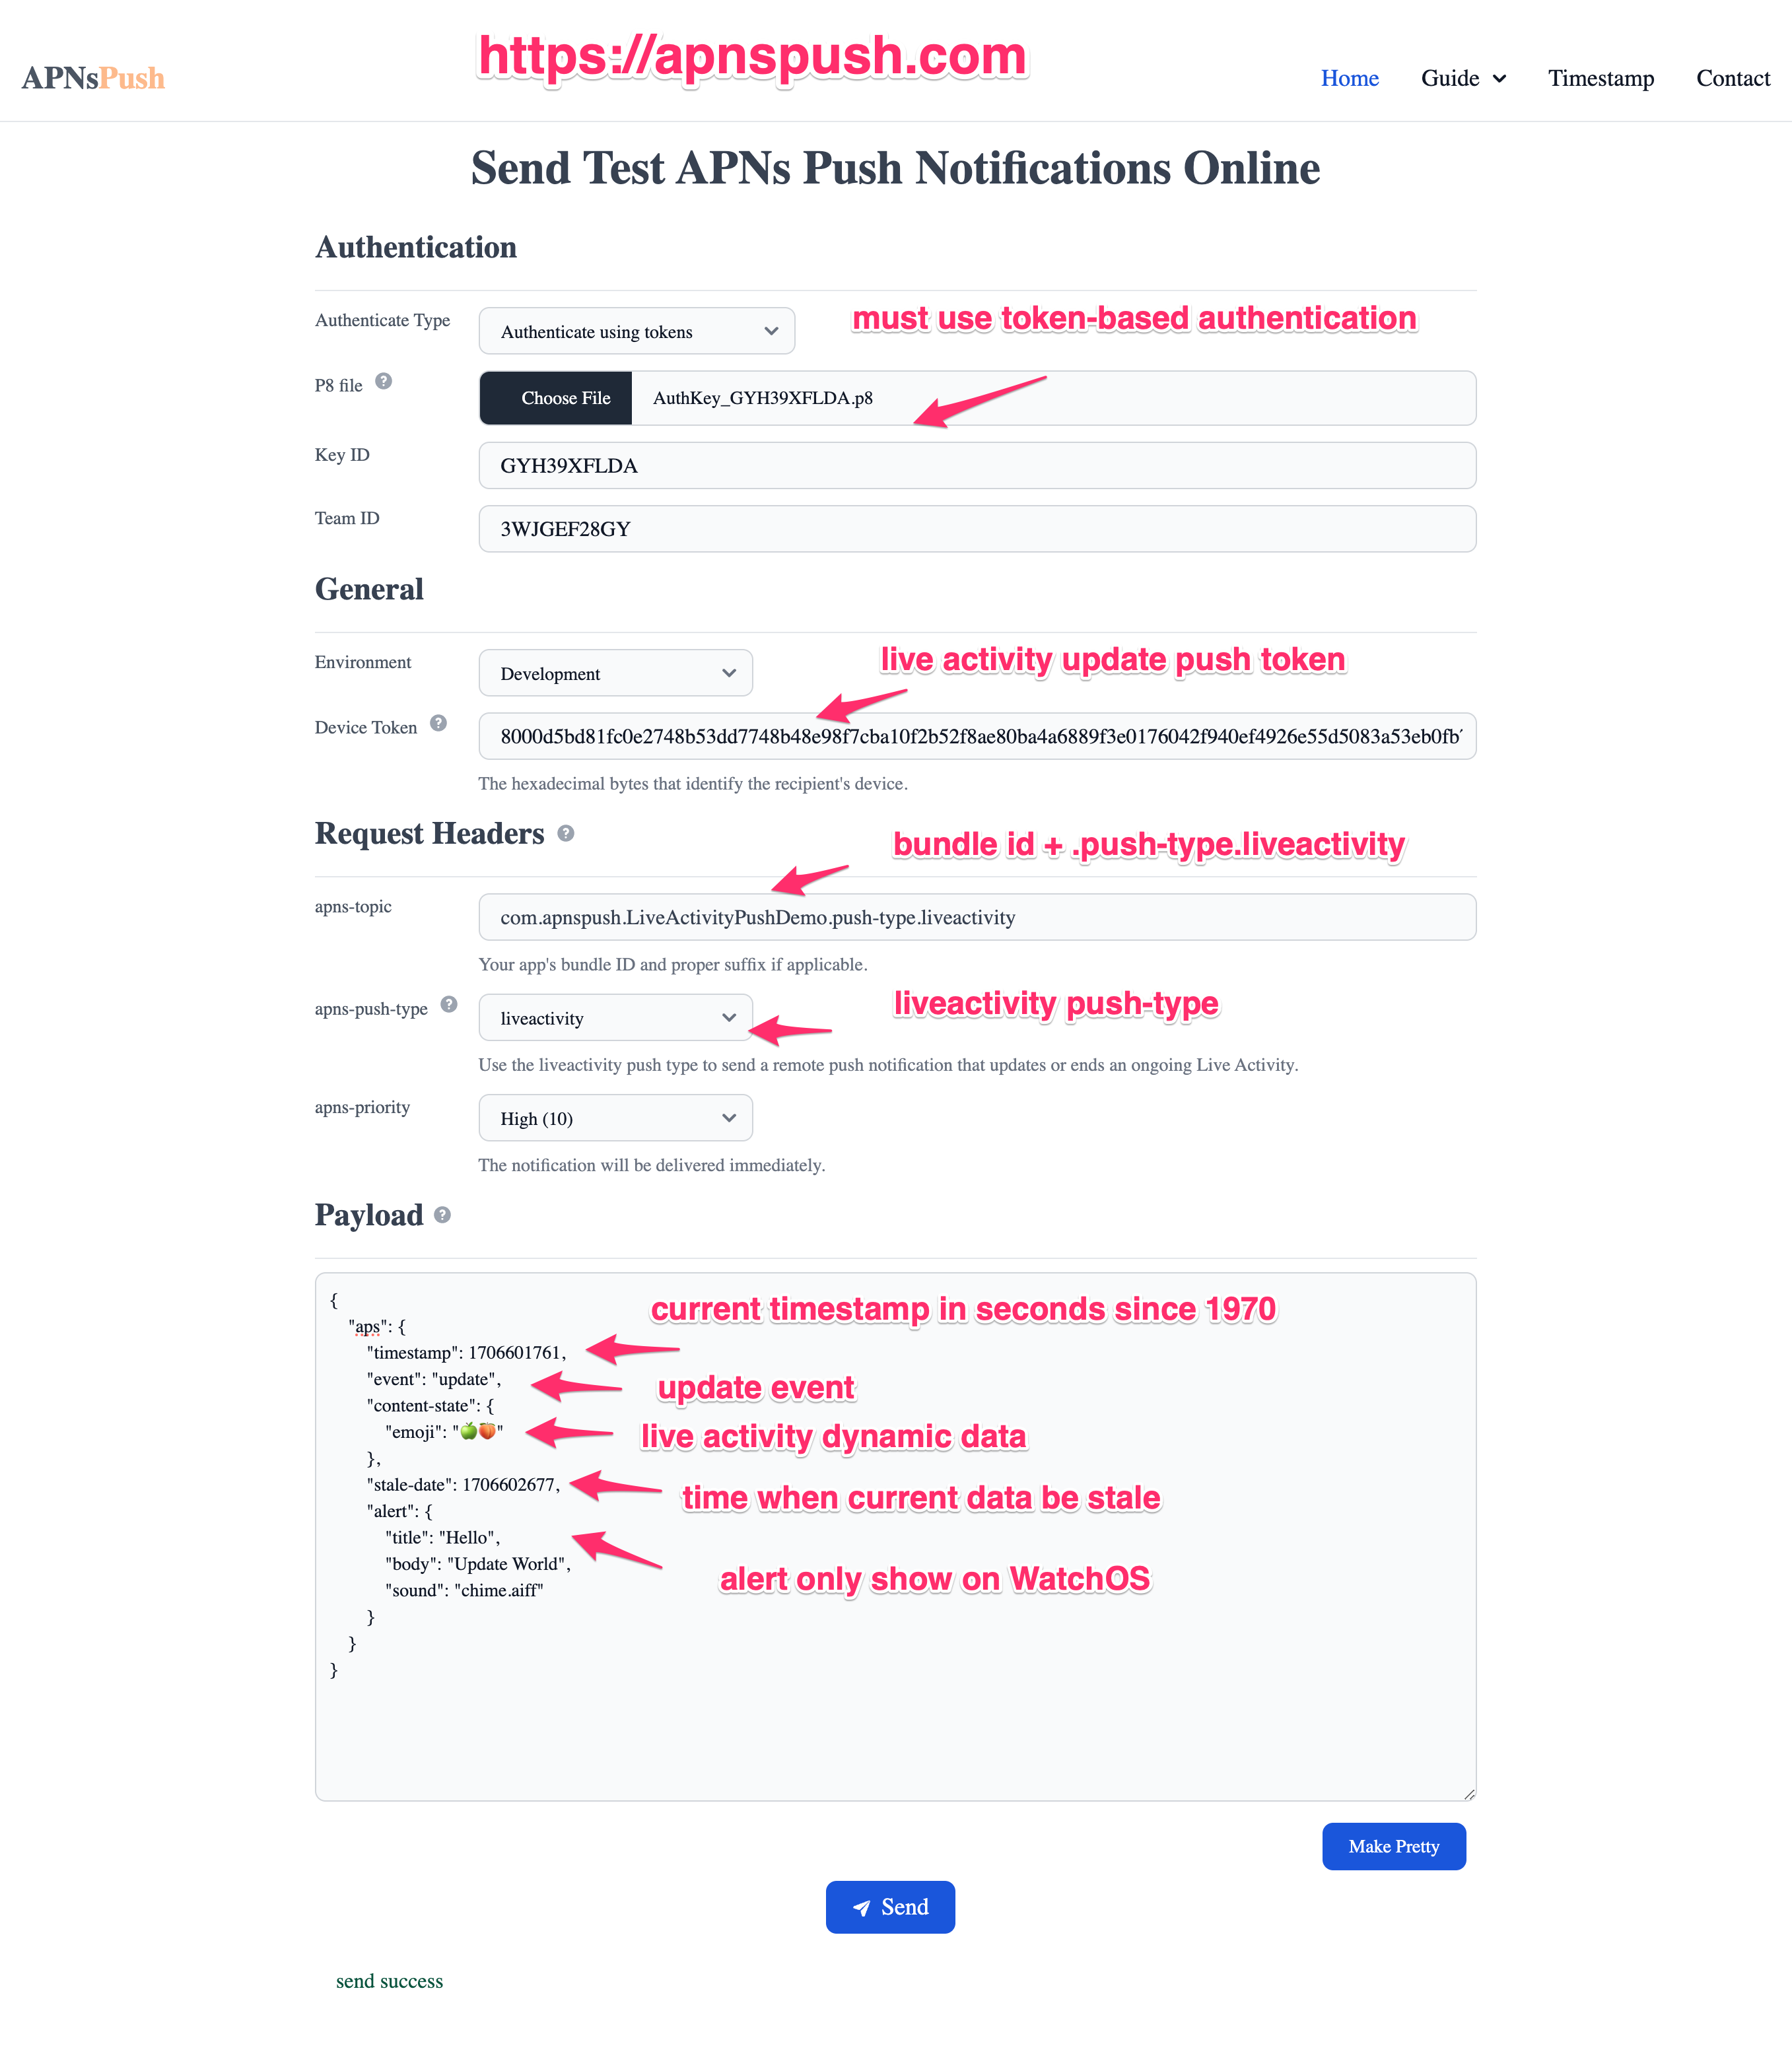
}Step4: Update a Live Activities With Push Notifications
Once we have got the push token for a Live Activity, either through step2 or step3, you can use it to send update or end event push notificaitons.
Host
Use HTTP/2 and TLS 1.2 or later to establish a connection between your provider server and one of the following servers.
- Development/Sandbox Environment:
api.sandbox.push.apple.com:443 - Production Environment:
api.push.apple.com:443
Request Header
- :method:
POST - :path:
/3/device/<liveactivity_push_token> - authorization:
bearer <provider_token> - apns-push-type:
liveactivity - apns-topic:
<your bundleID>.push-type.liveactivity - apns-priority:
5or10
Payload
- timestamp: Current UNIX timestamp in seconds.
- event:
update - content-state: The latest dynamic data of your live activity content.
- stale-date(optional): UNIX timestamp in seconds represents the time when the system will consider the Live Activity to be stale.
{
    "aps": {
        "timestamp": 1705560370,
        "event": "update",
        "content-state": {
            "emoji": "🍏🍑"
        },
        "stale-date": 1705567570
    }
}
You can uss apnspush to send update event push notifications like this.
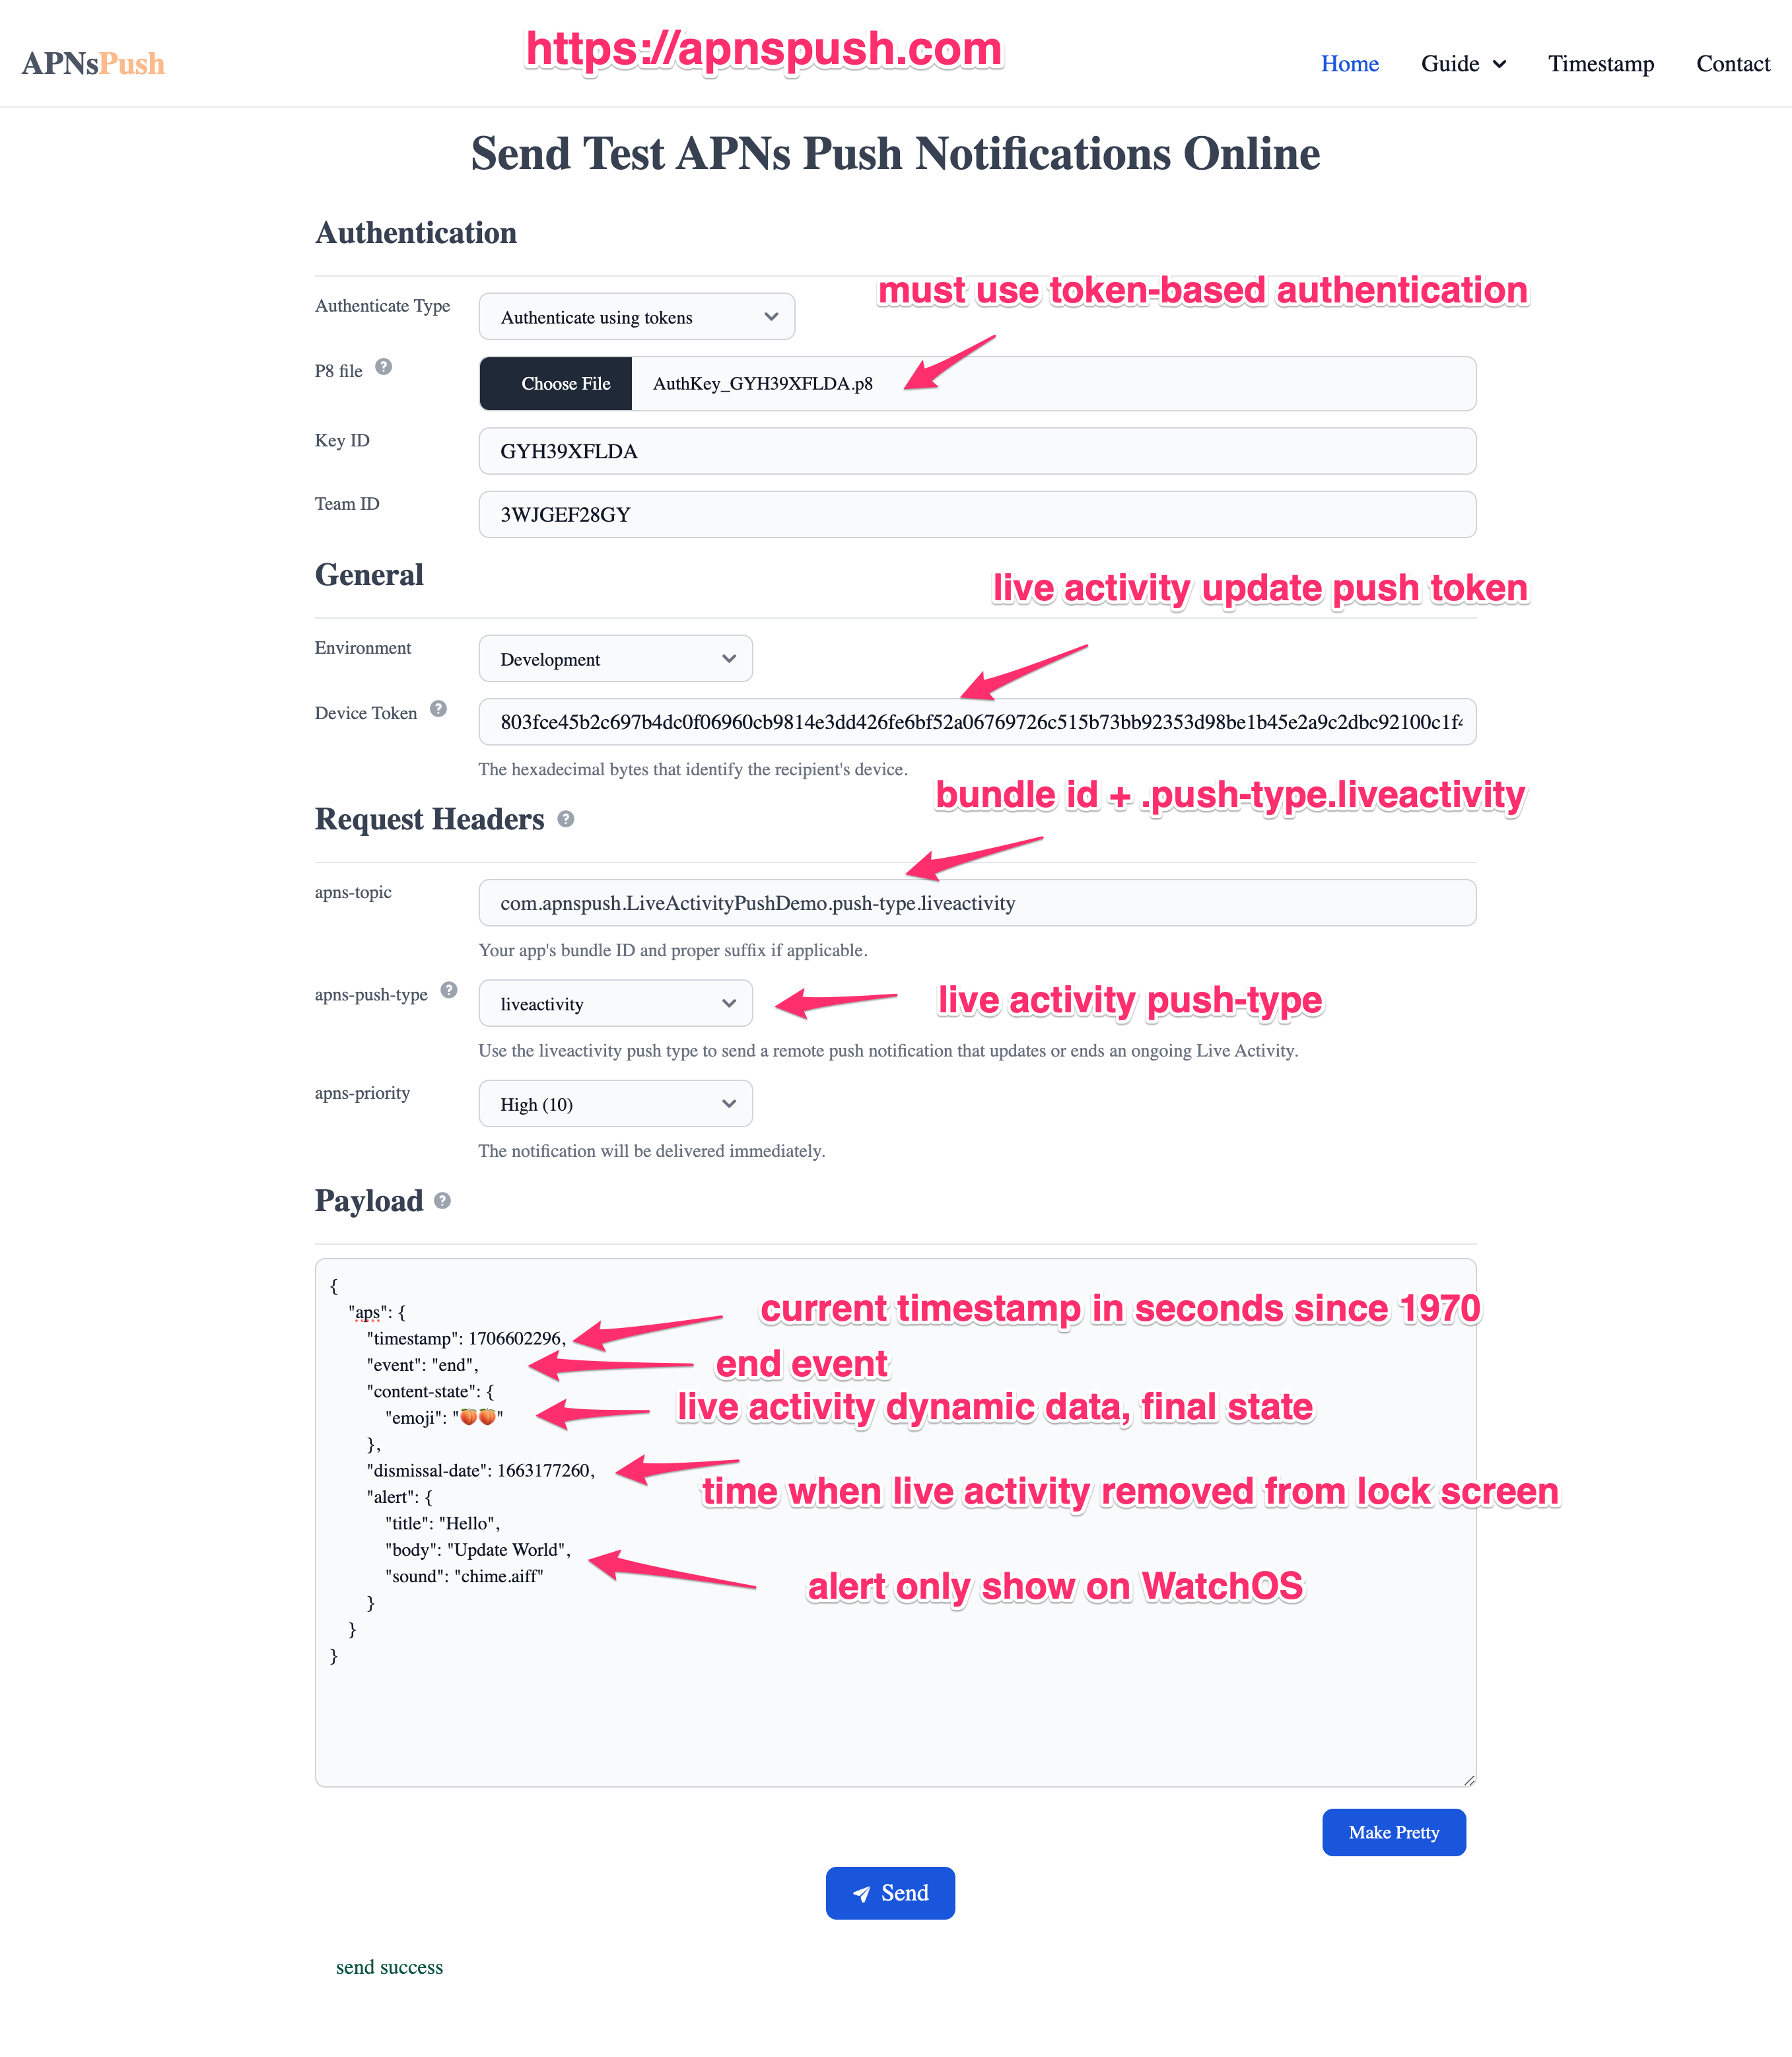
Step5: End a Live Activity With Push Notifications
Host
Use HTTP/2 and TLS 1.2 or later to establish a connection between your provider server and one of the following servers.
- Development/Sandbox Environment:
api.sandbox.push.apple.com:443 - Production Environment:
api.push.apple.com:443
Request Header
- :method:
POST - :path:
/3/device/<liveactivity_push_token> - authorization:
bearer <provider_token> - apns-push-type:
liveactivity - apns-topic:
<your bundleID>.push-type.liveactivity - apns-priority:
5or10
Payload
- timestamp: Current UNIX timestamp in seconds.
- event:
end - content-state: The final dynamic data of your live activity content.
- dismissal-date:
- The UNIX timestamp when the system will remove the Live Activity from the Lock Screen after it ends.
- By default, It's four hours after the live activity ends.
- If the value is in the past, the Live Activity will immediately dismiss after it ends.
{
    "aps": {
        "timestamp": 1705560370,
        "event": "end",
        "content-state": {
            "emoji": "🍑🍑"
        },
        "dismissal-date": 1705567570,
        "alert": {
            "title": "Hello",
            "body": "Update World",
            "sound": "chime.aiff"
        }
    }
}
You can use apnspush to send end event push notifications like this.
Payload fileds explanation
- timestamp
Set thetimestampto the current timestamp in seconds since 1970 to allow the system to always display the most recent ActivityKit push update. - event
To update a Live Activity, set the value to update.
To end a Live Activity, set the value to end. - content-state
Set the fields for thecontent-statekey to match your custom Activity.ContentState type. The system will decode the JSON payload and update or end the Live Activity.
If you end a Live Activity, also include the final content state to make sure the Live Activity displays the latest data after it ends.
Always use default encoding strategies to encode your data, or the system can't decode the JSON payload which result in update failures. - stale-date (optional)
Add a timestamp in seconds since 1970 in the optionalstale-datefield to provide the time when the system will consider the Live Activity to be stale. With each update, you can advance thisstale-date.
When you can’t update the Live Activity because of without network or other reasons for some time until it becomes stale, the activityState changes to ActivityState.stale at the specified date.
Use the activityStateUpdates stream in your app to monitor the activity state and respond to outdated Live Activities that haven’t received updates. - dismissal-date (optional)
When you end a Live Activity, by default the Live Activity appears on the Lock Screen for up to four hours after it ends to allow people to glance at their phone to see the latest information.
To change the time until the system removes a Live Activity from the Lock Screen after it ends, add a timestamp in seconds since 1970 in the optionaldismissal-datefield.
To dismiss the Live Activity from the Lock Screen immediately after it ends, provide a date fordismissal-datethat’s in the past — for example, "dismissal-date": 1663177260. - alert (optional)
To alert a person about a critical Live Activity update, optionally provide analertfield.
It will light up your device and display the expanded presentation on devices that support the Dynamic Island or a banner on devices that don’t support it.
Thetitleandbodyattributes of the alert will only be showed on Apple Watch.
Demo
Have any questions? Feel free to drop me a message on Twitter!