How to Send and Handle VoIP Push Notifications in iOS
What are VoIP Push Notifications
A Voice over Internet Protocol (VoIP) app lets the user make and receive phone calls using an Internet connection instead of the device’s cellular service.
In the past, a VoIP app had to maintain a persistent network connection with a server to receive incoming calls and other data. This meant sending periodic messages back and forth between your app and the server to keep a connection alive, which resulted in frequent device wakes that wasted energy. And if a user quit your VoIP app, he could no longer receive the incoming call.
Since iOS 8, Apple introduced VoIP push notifications which can wake your app and pass across information about incoming calls. VoIP push notifications are differ from standard push notifications.
- Your app need to use PushKit Framework to register and receive VoIP push notifications.
- VoIP push notifications are considered high-priority notifications and are delivered without delay.
- VoIP push notifications can include more data than all other push notifications.For VoIP push notifications,the maximum payload size is 5 KB (5120 bytes).For all other remote notifications, the maximum payload size is 4 KB (4096 bytes).
- Your app is automatically relaunched if it’s not running when a VoIP push notifications is received.
- Your app is given runtime to process a push, even if your app is operating in the background.
- For apps built using the iOS 13 SDK or later, PushKit requires you to use CallKit when handling VoIP calls. CallKit ensures that all apps providing call-related services work seamlessly together on the user’s device, and respect features like Do Not Disturb. CallKit also operates the system’s call-related UIs, including the incoming or outgoing call screens.
Prepare Your App to Receive VoIP Push Notifications
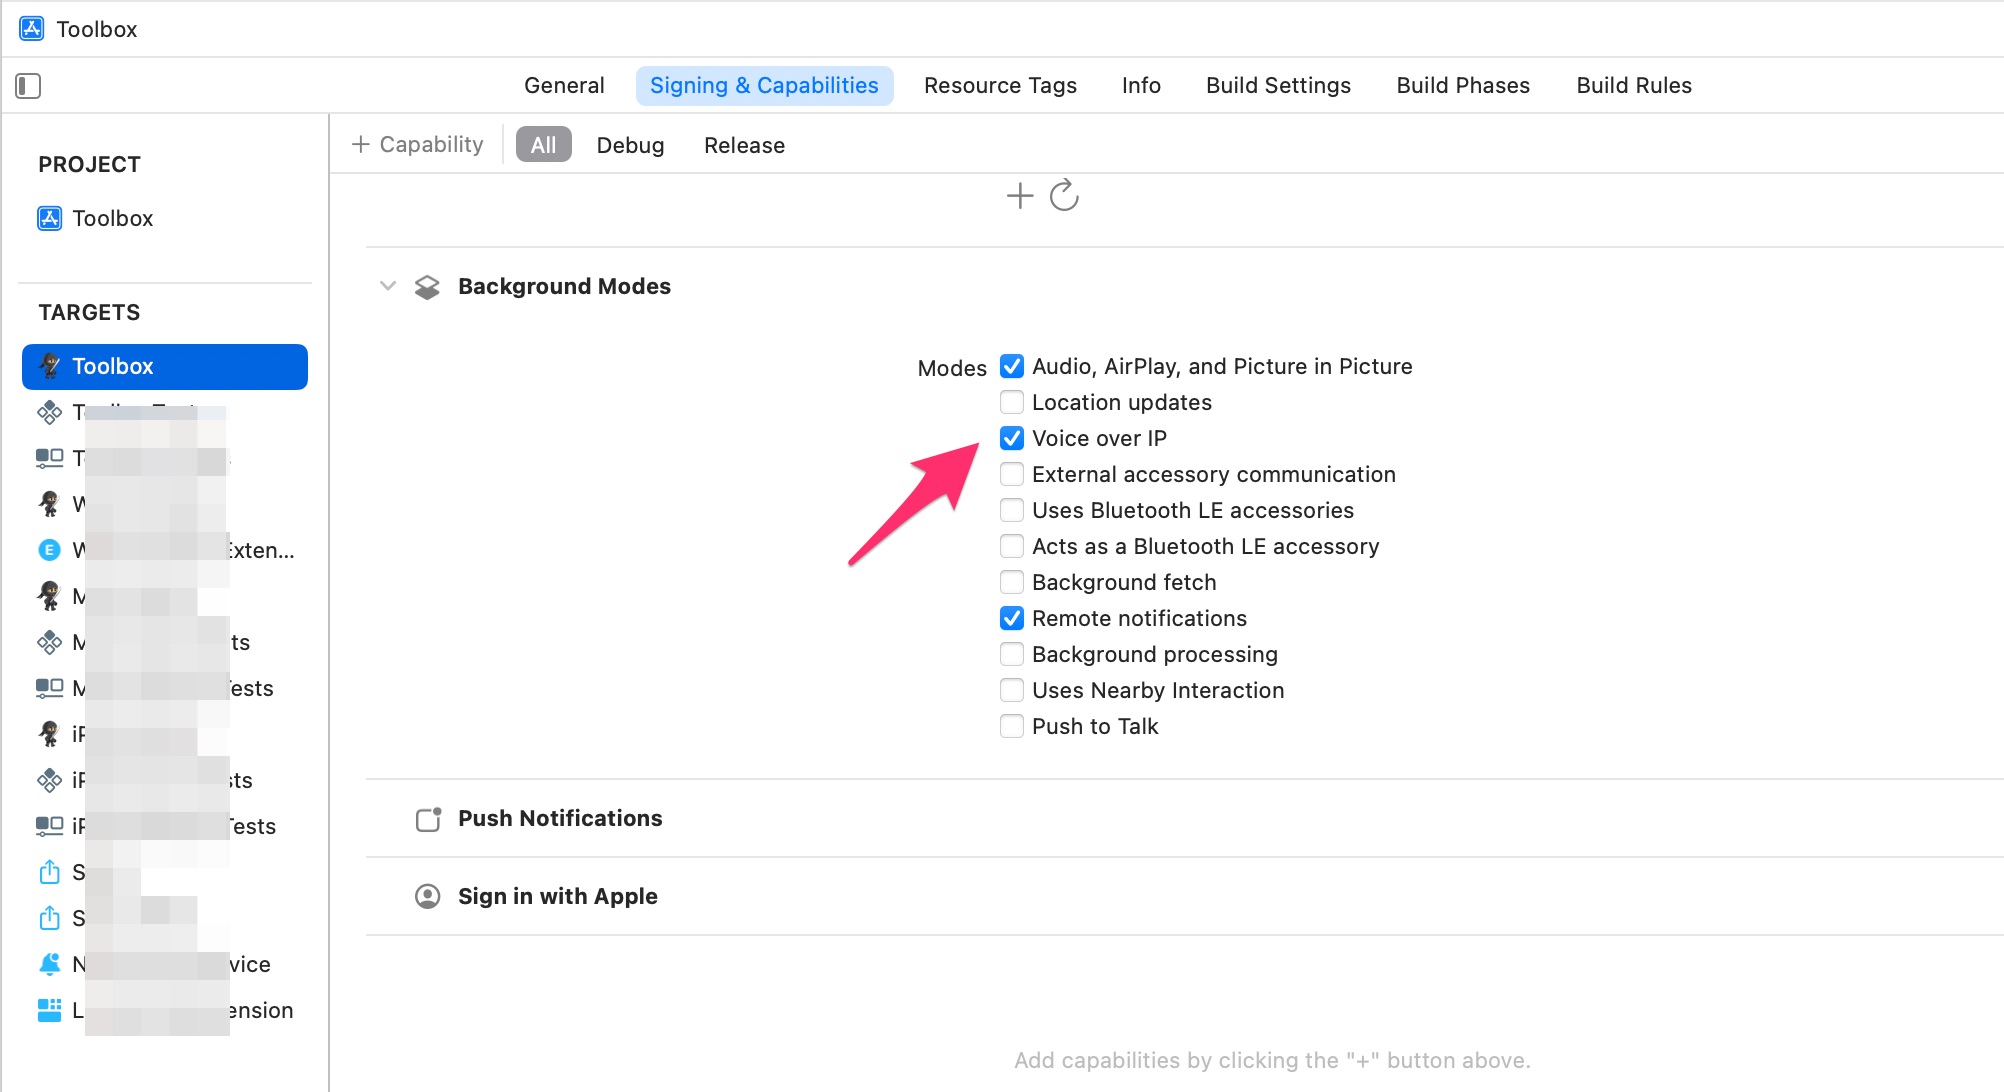
Enable the VoIP Background Mode in Your App
Enable background mode in the Xcode Project > Main Target > Signing & Capabilities panel. Select the checkbox for Voice over IP.
Register for VoIP Push Notifications Using PushKit in Your App
// Link to the PushKit framework
import PushKit

class AppDelegate: NSObject, UIApplicationDelegate {
   // Trigger VoIP registration on launch
   func application(_ application: UIApplication, didFinishLaunchingWithOptions launchOptions: [UIApplication.LaunchOptionsKey : Any]? = nil) -> Bool {
      self.voipRegistration()
      return true
   }

   // Register for VoIP notifications
   func voipRegistration {
      let mainQueue = DispatchQueue.main
      // Create a push registry object
      let voipRegistry: PKPushRegistry = PKPushRegistry(queue: mainQueue)
      // Set the registry's delegate to self
      voipRegistry.delegate = self
      // Set the push type to VoIP
      voipRegistry.desiredPushTypes = [.voIP]
   }
}
Handle Updated Push Notification Credentials (Device Tokens)
VoIP push notification device token is different from standard push notification devices, so you need to use the below PKPushRegistryDelegate method to receive VoIP pushs token and send the token to your push server.
extension AppDelegate: PKPushRegistryDelegate {
   // Handle updated push credentials
   func pushRegistry(_ registry: PKPushRegistry, didUpdate pushCredentials: PKPushCredentials, for type: PKPushType) {
      let deviceTokenString = pushCredentials.token.reduce("", { $0 + String(format: "%02X", $1) })
      print("VoIP device token: \(deviceTokenString)")
      // Register VoIP push token (a property of PKPushCredentials) with server
   }

}
Send VoIP Push Notifications From Your Server
Authentication
You can use either token-based authenticaiton or certificate-based authentication to send VoIP push notifications.
And, if you want to use certificate-based authenticaiton to send VoIP push notifications, you need to create a certificate that supports VoIP push notifications.
Request Headers
| Request Headers | Value |
|---|---|
| apns-push-type | voip |
| apns-priority | 10 |
| apns-topic | bundle ID + .voip |
In order to send VoIP push notifications, you need set apns-push-type to voip, set apns-priority to 10, and set apns-topic to your app bundle ID with .voip suffix.
Payload
VoIP push notificaiton payload need include information about the incoming call. For example, include the unique call identifier that your server uses to track the call. Your app can use this identifier to check in with the server later. You might also want to include information about the caller, so that you can display that information in the incoming call UI.
The maximum payload size of VoIP push notificaitons is 5 KB (5120 bytes).
{
   "aps" : {
      "alert":"VoIP Comming"
   },
   "handle" : "[email protected]",
   "callUUID" : "db1dff98-bfef-4ec0-8ac6-8187a3b0c645"
}
Send Test VoIP Push Notifications Using APNsPush
With all these information, you can try to send test VoIP push notifications using ApnsPush Test Tool.
Handle VoIP Push Notifications in Your App
For VoIP push notifications, the system launches or wakes your app and delivers the notification to your app’s PKPushRegistry object, which calls the pushRegistry(_:didReceiveIncomingPushWith:for:completion:) method of its delegate. Use that method to display the incoming call UI and to establish a connection to your VoIP server.
Create a Call Provider Object to Manage Calls in Your App
VoIP apps must use CallKit to present the system’s call-related interfaces. You present these interfaces using a CXProvider object, which manages user interactions for both incoming and outgoing calls. Create a provider object early in your app’s life cycle and make it available to your app’s call-related code.
import PushKit
import CallKit

class AppDelegate: NSObject, UIApplicationDelegate {
   var callProvider :CXProvider?

   // Trigger VoIP registration on launch
   func application(_ application: UIApplication, didFinishLaunchingWithOptions launchOptions: [UIApplication.LaunchOptionsKey : Any]? = nil) -> Bool {
      self.voipRegistration()
      self.createCallProvider()
      return true
   }

   // Register for VoIP notifications
   func voipRegistration {
      let mainQueue = DispatchQueue.main
      // Create a push registry object
      let voipRegistry: PKPushRegistry = PKPushRegistry(queue: mainQueue)
      // Set the registry's delegate to self
      voipRegistry.delegate = self
      // Set the push type to VoIP
      voipRegistry.desiredPushTypes = [.voIP]
   }

    func createCallProvider() {
        // Configure the app's CallKit provider object.
        let config  = CXProviderConfiguration()
        config.supportsVideo = true
        config.supportedHandleTypes = [.generic]
        config.maximumCallsPerCallGroup = 1

        // Create the provider and attach the custom delegate object
        // used by the app to respond to updates.

        callProvider = CXProvider(configuration: config)
        callProvider?.setDelegate(self, queue: nil)
    }

}

extension AppDelegate: CXProviderDelegate {
   /// Called when the provider has been reset. Delegates must respond to this callback by cleaning up all internal call state (disconnecting communication channels, releasing network resources, etc.). This callback can be treated as a request to end all calls without the need to respond to any actions
    func providerDidReset(_ provider: CXProvider) {
        print("Function: \(#function) called")
    }

    //optional delegate methods

}
Respond to VoIP Push Notifications in Your App
The following code example shows how you might process an incoming VoIP push notification in your pushRegistry(_:didReceiveIncomingPushWith:for:completion:) method.
After extracting the call data from the notification’s payload dictionary, create a CXCallUpdate object and pass it to the reportNewIncomingCall(with:update:completion:) method of your app’s CXProvider object.
While CallKit processes your request, establish a connection to your VoIP server in parallel; you can always notify CallKit later if you run into problems.
extension AppDelegate: PKPushRegistryDelegate {
    func pushRegistry(_ registry: PKPushRegistry, didUpdate pushCredentials: PKPushCredentials, for type: PKPushType) {
        let deviceTokenString = pushCredentials.token.reduce("", { $0 + String(format: "%02X", $1) })
        print("VoIP device token: \(deviceTokenString)")
        // Register VoIP push token (a property of PKPushCredentials) with server
    }

    // Handle incoming pushes
    func pushRegistry(_ registry: PKPushRegistry, didReceiveIncomingPushWith payload: PKPushPayload, for type: PKPushType, completion: @escaping () -> Void) {
        if type == .voIP {
            // Extract the call information from the push notification payload
            if let handle = payload.dictionaryPayload["handle"] as? String,
               let uuidString = payload.dictionaryPayload["callUUID"] as? String,
                let callUUID = UUID(uuidString: uuidString) {
                // Configure the call information data structures.

                let callUpdate = CXCallUpdate()
                let phoneNumber = CXHandle(type: .phoneNumber, value: handle)
                callUpdate.remoteHandle = phoneNumber
                callUpdate.hasVideo = false
                callUpdate.supportsGrouping = false
                callUpdate.supportsHolding = false
                callUpdate.supportsDTMF = false

                // Report the call to CallKit, and let it display the call UI.
                callProvider?.reportNewIncomingCall(with: callUUID, update: callUpdate, completion: { (error) in
                    if error == nil {
                        // If the system allows the call to proceed, make a data record for it.
                        // let newCall = VoipCall(callUUID, phoneNumber: phoneNumber)
                        // self.callManager.addCall(newCall)
                    }
                    // Tell PushKit that the notification is handled.
                    completion()
                })

            }
            // Asynchronously register with the telephony server and
            // process the call. Report updates to CallKit as needed.

            // establishConnection(for: callUUID)
        }
    }

    func pushRegistry(_ registry: PKPushRegistry, didInvalidatePushTokenFor type: PKPushType) {
        // Notify your push server to invalid VoIP push token
    }
}
If the system allows your call to proceed, the reportNewIncomingCall(with:update:completion:) method executes its completion block and CallKit displays the incoming call interface. At that point, use the delegate of your CXProvider object to respond to user interactions with the interface. For example, use your delegate to respond when the user answers or ends the call.
Have any questions? Feel free to drop me a message on Twitter!